Site Configuration
This section is intended not as a guide to configuring MISO, but to explain the configuration options that are available. If you are interested in using one of these features and it is not available in your installation, talk to your MISO administrators about setting it up.
Logging In
You log in to MISO using a username and password. These credentials may come from different places, depending on your site configuration.
In some cases, user accounts are stored in the MISO database. When this is the case, MISO administrators are responsible for creating new users. Any user is able to edit their own user details and change their password from within MISO. MISO administrators are also able to reset a user's password.
In other cases, your credentials may come from an LDAP or Active Directory server. This will usually be for cases where the same credentials are used for several services. For instance, you may use the same account to log into your email, issue tracker, MISO, and other services within your organization. If your site uses LDAP or Active Directory authentication, you will have to have an account in that system, and also have to be included in the correct group(s) to access MISO. Your MISO administrators may not be directly responsible for creating these accounts or managing the groups, but they should be able to help you get set up.
If you require a new account, password reset, or are otherwise unable to log in to MISO, you should talk to your MISO administrators.
Issue Trackers
MISO integrates with issue trackers in order to display and link to issues from within MISO. The only currently-supported issue tracker is JIRA. If JIRA integration is configured for your site, you will see a list of related issues on the Project page and the Run page. These lists are described in more detail in the Projects and Sequencer Runs sections.
MISO may also be configured to take bug reports. If it is, a "Report a problem" link will appear near the top right of the screen (see the figure below). Click this link to report a bug in your issue tracker.
 Bug report link
Naming Schemes
Some institutes will have a specific and uniform way of naming things. MISO allows you to customize the validation of some fields in order to enforce these naming schemes:
- All item names
- Sample alias
- Library alias
- Library aliquot alias
- Project short name
It may also be possible to auto-generate aliases for your samples, libraries, and/or library aliquots.
Both validation and alias generation must be configured by your MISO administrators.
Taxon Lookup
A NCBI service may be used to validate scientific names to ensure that the name is entered correctly. If this is enabled, you will not be able to save a scientific name unless it matches a species in the taxonomy database. You can browse the taxonomy database using NCBI's Taxonomy Browser.
Automatic Barcode Generation
If automatic barcode generation is enabled for your site, MISO will automatically generate a unique barcode any time you leave the barcode field blank for an item. These barcodes, whether auto-generated or not, may be printed from MISO to a label printer. See the Barcode Label Printers section for more information.
Barcode Scanners
Barcode scanners may be used to enter barcodes into any text-entry area in MISO. Most barcode scanners allow you to configure a key to send after scanning. If you configure your barcode scanners to send the Enter key after a scan, that will save you from having to press Enter or click on a button or the next item every time to scan a barcode. This configuration is done on the barcode scanner itself, and you should see the scanner's manual for configuration instructions.
It is also possible to use Thermo Fisher VisionMate™ High Speed Barcode Readers to scan entire boxes of tubes at once. These bulk scanners must be configured by your MISO administrators to work in MISO.
Report Links
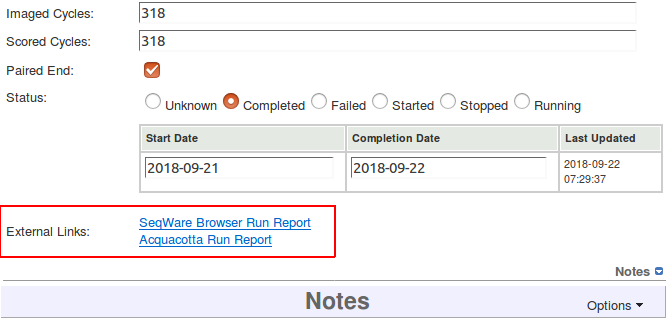
If you are generating reports for projects or runs outside of MISO, it may be possible to automatically link to them from the MISO Project and Run pages. For projects, it must be possible to generate the report URL using the project's ID, name, and/or short name. For runs, it must be possible to generate the report URL using the run's ID, name, and/or alias. For example, you could create links to http://www.example.com/projects/{project-id}/stats or http://www.example.com/runreports/{run-alias}.html. The report links will appear in the External Links section of the Run or Project page (see figure below).
 Report links
Default Values
It is possible to set a default value for some fields to save users from repetitive entry. If a default value is configured, it will be filled in automatically when creating new items. The user is still free to change the value if they would like.
The only field that can currently be configured with a default value is sample scientific name.
Display Options
In some organizations, it may be desirable to hide certain fields in order to simplify the forms. The following fields can be configured to be hidden on bulk create/edit pages.
- Library alias (should only be hidden if Library aliases are automatically generated)
- Library description
- Library volume
These fields will always be displayed on the single item create/edit pages, even if they are hidden on the bulk create/edit pages.
Detailed Sample Mode
By default, MISO uses plain sample mode. In plain sample mode, you create samples and propagate libraries from them.
If detailed sample mode is enabled, a sample hierarchy is added in order to store more information about samples and how they have been created and processed. This means that instead of creating a single sample in MISO, you may create several samples that represent the process a sample has gone through before arriving at the aliquot step, from which libraries may be propagated. Rather than thinking of this as multiple samples, you may also think of it as the same sample going through multiple steps.
The exact sample classes that are available in detailed sample mode depend on your site's configuration, but these sample classes are divided into the following sample categories:
- Identity: describes the donor or organism that the sample originated from
- Tissue: describes a piece of tissue collected from the donor or organism
- Tissue Processing: describes additional processing steps before analyte was extracted from the tissue (optional)
- Stock: analyte sample that may be divided into several aliquots
- Aliquot: analyte sample ready to be made into a library, or used for other purposes
In some cases, you will not have all of these samples. For example, you may have received aliquot samples from a collaborator. In this case, it doesn't make sense to create a tissue or stock sample. MISO will allow you to skip levels and create an aliquot sample directly. When you do this, "ghost samples" will automatically be created to represent the missing levels. This is so that you can still record any information that you know about those levels. You may know what the tissue origin was and want to record it even if you never received the tissue, for example.
The other advantage to having these ghost samples is that if you receive other related samples, they can be connected to the existing hierarchy. For example, if you receive two different aliquots from the same tissue sample, it will be easier to find that they are related because they are connected to the same ghost tissue.
Strict Index Checking
By default, any library aliquot can be added to a pool. When strict index checking is enabled, library aliquots cannot be added to a pool when their addition would cause duplicate or near-duplicate indices to exist within the pool.
The advantage of enabling this setting is the prevention of sequencing library aliquots which cannot be de-multiplexed.
Email Notifications
If configured, notifications of item transfers can be sent via email to both internal users and external contacts. See Transfer Notifications for more information.