Boxes
A Box represents a physical storage container with defined positions, and can be used to track where samples, libraries, library aliquots, and/or pools are stored. There are several important box properties:
- Box size: the number of rows and columns in the box. See Type Data for more
information.
- The
scannableproperty of a box is also stored in the box size. A box is scannable if it can be read by a bulk barcode scanner.
- The
- Box use: what the box items will be used for. Values can include "DNA", "RNA", "Library", "Slide",
"Sequencing", "Storage", and more. See Type Data for more information.
- The Boxes List page contains separate tabs for each box use.
- Location: a user-provided description of where the box is kept.
- Freezer location: boxes can be stored in freezers in order to precisely track their locations.
Boxes List
To get to the Boxes list page, click "Boxes" in the Preparation list in the menu on the left side of the screen. Boxes are categorized by tabs, with one tab for each box use. Each box will only be listed under one box use tab, and searching for a box only searches the current tab. The toolbar at the top of each table includes many controls for working with boxes.
Creating Boxes
To create new boxes, click the "Add" button in the toolbar at the top of the Boxes list. In the dialog that appears, enter the quantity of boxes you would like to create. Click the "Create" button.
If you chose to create one box, you will be taken to the Create Box page. Enter all of the box information and then click the "Save" button at the top right of the screen when you are done. If the box fails to save, a message will be displayed underneath the invalid fields. You can then make appropriate adjustments and click the "Save" button to try again.
If you chose to create more than one box, you will be taken to the bulk Create Boxes page. For additional information regarding some of the fields in the table, or for information on how to work with the bulk table, check the Quick Help section near the top of the screen. Enter all of the boxes' information and then click the "Save" button at the top right of the screen when you are done. If any of the boxes fail to save, a message will be displayed at the top of the screen explaining the problem(s). You can then make the appropriate adjustments and click the "Save" button to try again.
It is also possible to create a box when creating samples, when propagating libraries or samples (if detailed sample mode is enabled), and when receiving libraries.
- Click the appropriate box and fill out how many items to create/receive/propagate:
- Creating samples: Go to the Samples list page and click "Create" in the toolbar at the top of the table. In the Create Samples dialog box that opens, check "Create New Box", fill out the rest of the fields in the dialog, and click "Create".
- Propagating samples or libraries: Go to the Samples list page. Check the box next to the desired parent samples and click "Propagate" in the toolbar at the top of the table. In the Propagate dialog box that opens, check "Create New Box", fill out the rest of the fields in the dialog, and click "Propagate".
- Receiving libraries: Go to the Libraries list page and click "Receive" in the toolbar at the top of the table. In the Receive Libraries dialog box that opens, check "Create New Box", fill out the rest of the fields in the dialog, and click "Receive".
- The open dialog box displays Create Box fields. Fill out the fields and click "Create".
- The bulk create/propagate/receive items page will open, and the Box Alias field will be filled in with the alias of the newly-created box. Continue creating/propagating/receiving items as per usual.
Editing Boxes
Boxes can be edited individually or in bulk. Bulk editing is convenient when you have several boxes to modify at once. Editing individual boxes is sometimes preferable because it allows you to modify the box contents as well as the box attributes.
Most box fields can be edited, with the exception of the box ID, name, and size.
To select boxes for bulk editing, go to the Boxes list page, select the boxes you wish to edit, and click "Edit" in the toolbar at the top of the table.
To edit a single box, go to the Boxes list page and click on the target box's name or alias.
Freezer location can be changed in several ways:
- On the Edit Box page, click the "Scan" button. Scan a location barcode and follow the prompts.
- On the Edit Box page, click the "Select" button. Select a freezer from the dialog, then follow the prompts to choose a location within the selected freezer.
- On the Edit Box page, click "Remove" to clear the freezer location.
- On the bulk Edit Boxes page, scan the freezer location barcode into the Freezer Location Barcode cell. The Freezer Location cell will update automatically with the appropriate freezer location details.
 Contents diagram and table
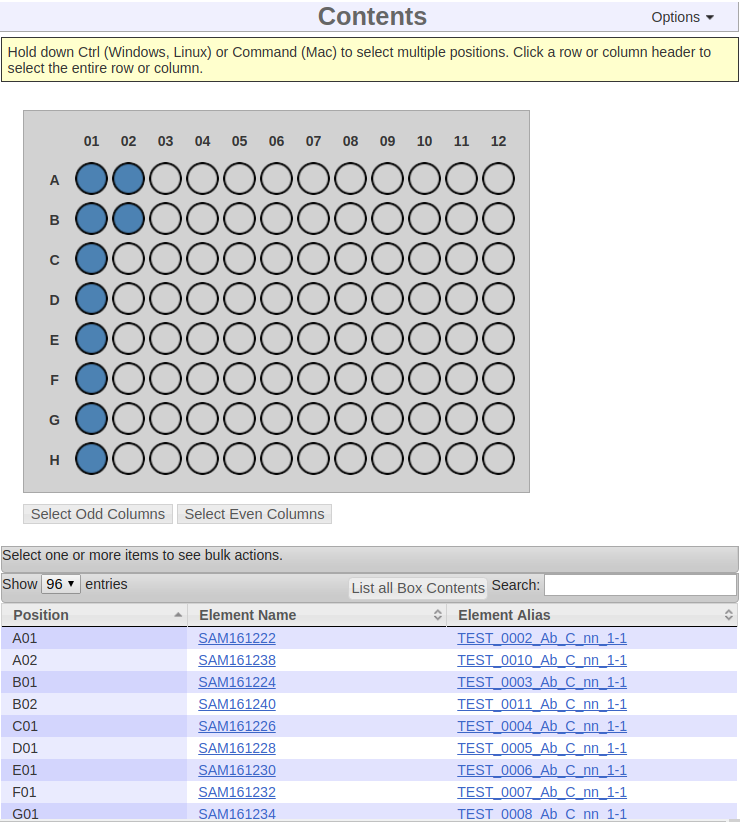
On the Edit Box page, if no positions are selected in the Contents diagram, the table will contain all box contents items. If one or more positions in the Contents diagram are selected, the table will be filtered to display only those items, and available actions for those items will be displayed at the top of the table.
Selecting Positions within a Box
Positions with items in them are represented by blue circles in the Contents diagram, while empty positions are represented by grey/white circles. If a position in the Contents diagram is selected, its circle will appear brighter than that of an unselected position.
If a single position is selected, information about its contents and available actions is displayed near the Contents diagram. If multiple positions are selected, the information displayed changes to be a series of search boxes for quickly adding items to those positions.
To select a single position, click on a circle in the Contents diagram. The circle will become brighter to indicate that it is selected. To unselect a single position, hold Ctrl (Windows, Linux) or Command (Mac) while you click a selected circle.
To select multiple positions, hold Ctrl (Windows, Linux) or Command (Mac) while you click on the target circles in the Contents diagram. To unselect multiple positions, hold Ctrl (Windows, Linux) or Command (Mac) while you click on the circles you wish to unselect. The circles will become less bright to indicate that they are not selected.
To select an entire row or column, click on the row or column heading. To select multiple rows or columns, hold Ctrl (Windows, Linux) or Command (Mac) while you click on the target row or column headings.
To select all positions, click the "Select All" button below the Contents diagram. To select all odd columns, click the "Select Odd Columns" button below the Contents diagram. To select all even columns, click the "Select Even Columns" button below the Contents diagram.
To unselect all positions, click the "List all Box Contents" button at the top right of the contents table, near the Search field.
Adding a Single Item to a Box
On the Edit Box page, select the target position in the Contents diagram. In the information section that appears adjacent to the Contents diagram, scan the item's barcode, or type its name, alias, or barcode into the "Search" field and press the Enter key or click "Lookup".
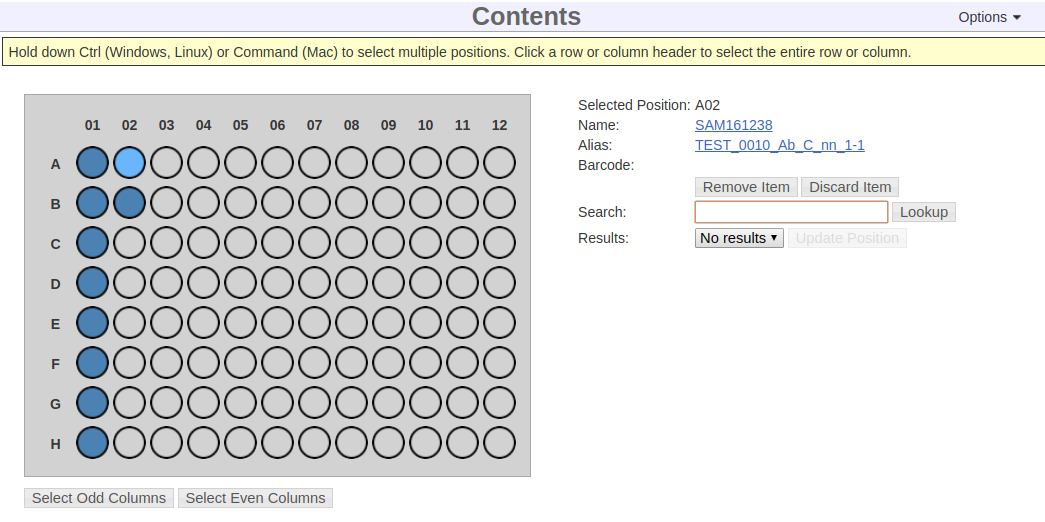 Additional information when one position is selected
Once the search completes, any matching items found will be in the "Results" dropdown. Select the target item from the dropdown and click "Update Position". After the update completes, the information about the item in the selected position will update with the target item's information.
If the target position already contains an item, saving the new item to that position will cause the existing item's location to become unknown. If the existing item's location should be tracked, it should be moved to a new box before or after saving the new item to the target position.
Adding Multiple Items to a Box
On the Edit Box page, select the target positions in the Contents diagram. Find the Position and Search rows adjacent to the Contents diagram, and scan each target item's barcode or type its name, alias, or barcode into the Search field for its target position.
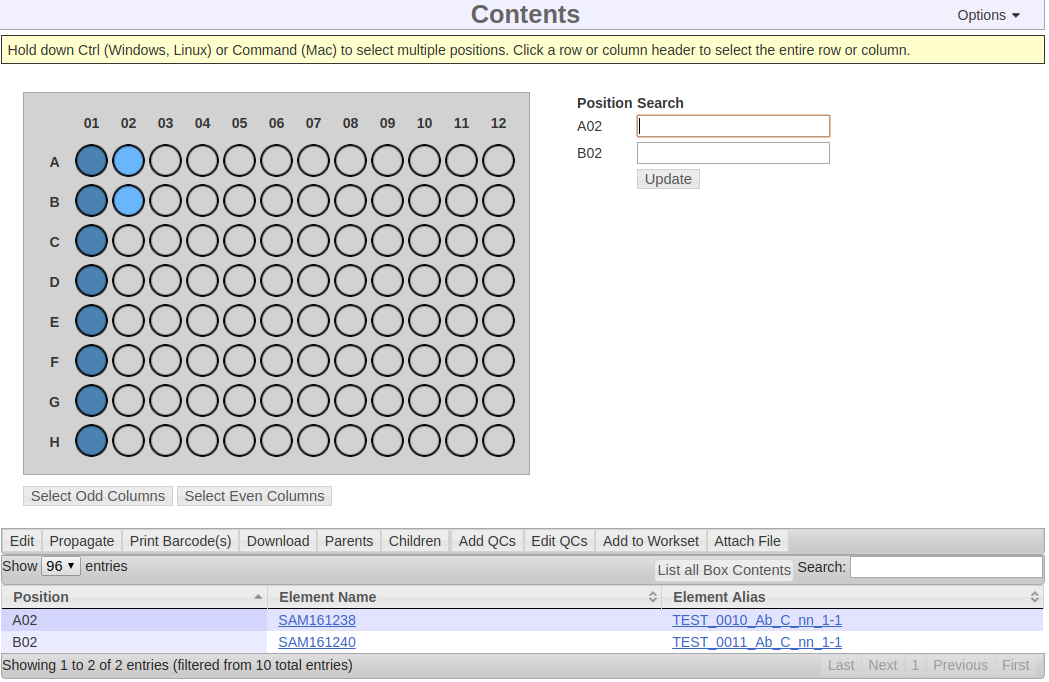 Additional information when multiple positions are selected
Once all Search fields are filled out, click "Update" below the last search field. If any of the target positions already contains an item, a dialog box will name the items that already occupy those positions and ask you to confirm that you wish to replace them with the items matching your search terms. If any items to be replaced are not being re-added to a different position in the box, they will be removed from the box. Click "Replace" to continue, or "Cancel" to cancel the update and select new positions.
If one item is found for each position, the page is refreshed and the Contents diagram and table will contain the target items. If more than one item is found for a given position, or if no matching item can be found for a given search term, no items will be updated and a dialog box will display the search terms which were in error.
Multiple items can also be added to a box using the Scanning a box instructions.
Removing a Single Item from a Box
A single item can be removed from a box. It is advised to scan it into another box or location position soon in order to keep tracking its location in MISO.
Go to the Edit Box page and select the target position in the Contents diagram. In the information section that appears adjacent to the diagram, click "Remove Item". In the dialog box that appears, click "Remove" to confirm that you wish to remove this item from the box. The page will refresh, and the target position will be empty in the Contents diagram.
Discarding a Single Item from a Box
A single item can be discarded from a box to indicate that the item no longer needs to be tracked. When an item is discarded, its volume will be set to "0", discarded will be set to true, and its location will be shown as "EMPTY". Discarded items can not be added to boxes.
Go to the Edit Box page and select the target position in the Contents diagram. In the information section that appears adjacent to the diagram, click "Discard Item". In the dialog box that appears, click "Discard" to confirm that you wish to discard this item from the box. The page will refresh, and the target position will be empty in the Contents diagram.
Discarding All Items from a Box
It is possible to discard all of the items from a box in a single operation. To do this, go to the Edit Box page by clicking on the box name in the Boxes list page. The Contents section heading has an Options menu on the far right of the heading; hover over it to reveal the menu, and click "Discard All Contents". In the Discard All Contents dialog box that appears, click "Discard" to continue discarding all items from the box. The page will refresh and the box will be empty.
Scanning a Box
If your MISO is configured to use a box scanner, then the box contents can be updated in one operation using that box scanner (at the time of this writing, only the Thermo Fisher VisionMate High Speed Barcode Reader is supported). A MISO box must be scannable (part of the box size attribute) in order to have the scanning option available.
To scan a box, first open the box scanner software on the computer (outside of MISO). Then, go to the Edit Box page by clicking the box name in the Boxes list page. The Contents section heading has an Options menu on the far right of the heading; hover over it to reveal the menu, and click "Scan with <scanner-name>", where <scanner-name> is a box scanner that your MISO is configured for. If "Scan with <scanner-name>" is not visible in the list, your box may not be scannable or MISO may not be configured to use this box scanner.
Wait until the Scan dialog box prompts you to place the box on the scanner. It will automatically scan the box. Once the scan is complete, the diagram will display the tubes which the scanner found.
Once a successful scan is made, review the changes that would be made and click "Save".
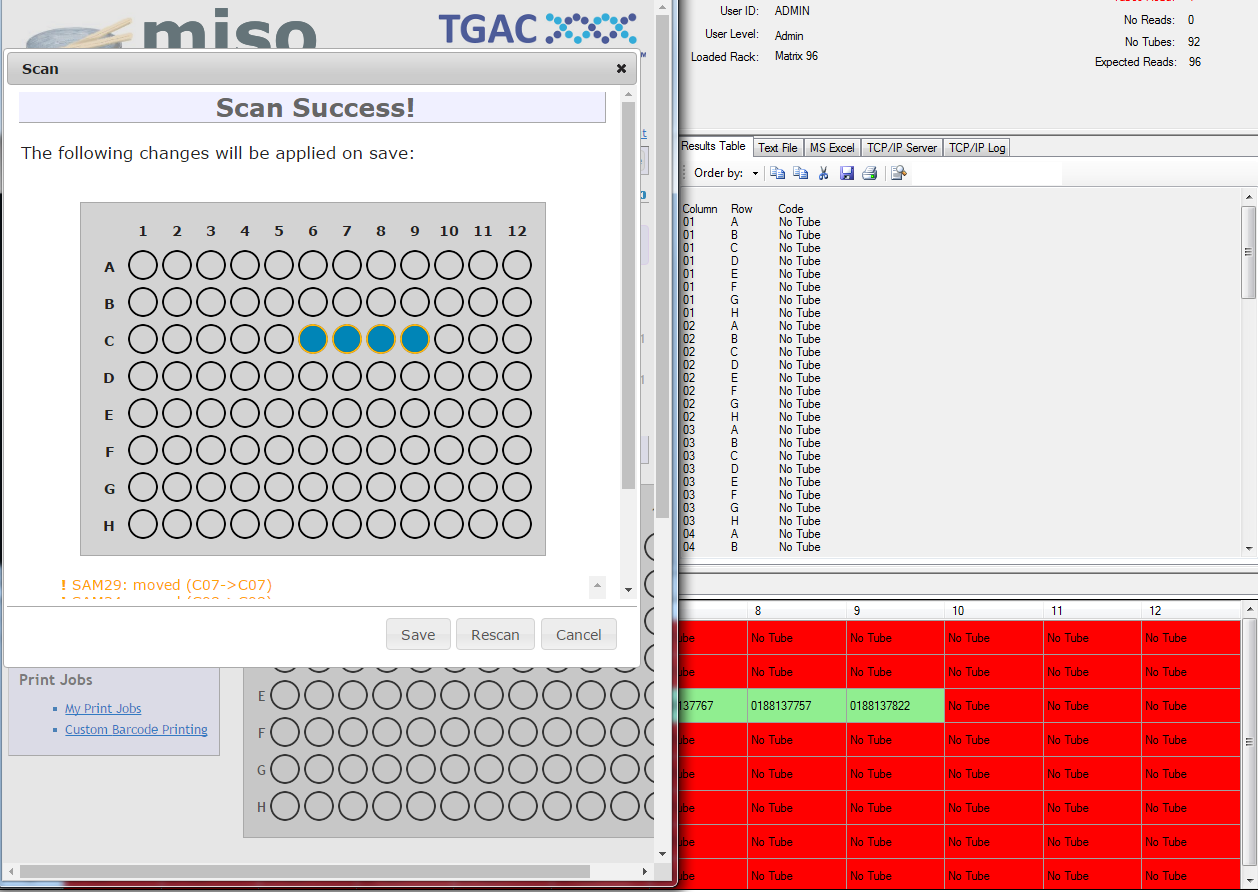 Successful box scan
If there are any errors with the scan, the scan will need to be retried until there are no errors. Possible sources of error are:
- The scanning software is not open
- This will cause a "could not find the scanner" error message. Open the scanner software on the computer and rescan.
- A "No Read" scan result for a tube
- This is often caused by dust on the scanner surface or frost on the tubes. Clean the scanner surface and/or tube bottoms and rescan.
- A barcode is scanned which is not associated with an item in MISO
- Ensure that the tube barcode is correctly associated with an item in MISO.
- The network is down or MISO cannot connect to the scanner
- Fix these problems first, then rescan.
Exporting Box Information
Go to the Edit Box page by clicking on the box name in the Boxes list page. The Contents section heading has an Options menu on the far right of the heading; hover over it to reveal the menu, and click "Export Box to Excel". The Excel spreadsheet containing information about the box contents and their positions will be downloaded.
Filling a Box by Barcode Pattern
Sometimes it may be helpful to assign user-generated barcodes to items (especially if they are not already in barcoded tubes), and these user-generated barcodes can be used to quickly put items into boxes.
For example, a plate can be represented in MISO as a non-scannable box. Adding items to this plate in MISO allows for easy tracking of which item is in which plate position. Items in a plate do not have a tube barcode and while it is possible to add a single item to a plate or even to add multiple items to a plate, it can be tedious to fill an entire plate this way. Instead, these items can be edited to have a matrix barcode attribute which represents a plate position rather than a physical barcode. Plate position barcodes must follow a specific pattern:
- The item's barcode must be made up of two parts: a prefix representing the box + a box position suffix.
- The prefix for the box must be unique, but it does not have to match any of the box attributes (name, alias, matrix barcode).
- The box position suffix must be in one of two formats: "standard" (A01, F12, where the letter represents
the row and the number represents the column) or "numeric" (001, 002, etc. moving in rows from the top
left)
- Note that for the "standard" format, column numbers less than 10 must have a 0 (zero) added to the beginning of the number. Column 1 would be represented as "01", column 2 would be "02", etc. This matches the column numbers on the box Contents diagram. * So for example, an item with barcode "FIRST-BOX-A01" in an 8x12 box would be intended for the first row, first column, and an item with barcode "FIRST-BOX-B04" would be intended for the second row, fourth column of the same box.
- Note that for the "numeric" format, 001 is the position in the first row, first column, 002 is the position in the first row, second column, etc. Numbering moves from left to right filling a row, and then continues from left to right on the next row, etc. * So for example, an item with barcode "FIRST-BOX-001" in an 8x12 box would be intended for the first row, first column, and an item with barcode "FIRST-BOX-016" would be intended for the second row, fourth column of the same box.
Before filling by barcode pattern on the Edit Box page, the items must first be saved with the barcodes representing the box positions, as above. Then, go to the Edit Box page by clicking on the box name in the Boxes list page. The Contents section heading has an Options menu on the far right of the heading; hover over it to reveal the menu, and click "Fill by Barcode Pattern".
In the Fill by Barcode Pattern dialog box that appears, enter the prefix (from our example above, that would be "FIRST-BOX-"). Then select whether the suffix is "Standard" or "Numeric", and click "Fill". The box page will refresh and any items with matching barcodes will be placed in their appropriate positions. Note that any items that were in the box before the Fill By Barcode Pattern was applied will be removed from the box.
Working with Items in a Box
Actions can be performed on all selected items in a box.
First, go to the Edit Box page by clicking on the box name in the Boxes list page. Select the target positions of the items you wish to act upon. In the toolbar at the top of the contents table, several actions are available for the selected items, provided that they are all of the same type (sample, library, library aliquot, pool). The actions available are the same as those found on the Samples, Libraries, Library Aliquots, and Pools list pages.
Printing Barcodes
Barcode labels can be printed for a series of boxes from the Boxes list. See the Barcode Label Printers section - Printing Barcodes for details on how to do this.
Deleting Boxes
To delete boxes, go to the Boxes list, check the checkbox(es) next to the box(es) that you wish to delete, and click the "Delete" button in the toolbar at the top of the table. A box can be deleted while it still has items in it; in this case, the items will be removed from the box and their location will be unknown to MISO. It is recommended that you add them to a new box if you wish their location to be tracked in MISO. A box can only be deleted by its creator or a MISO admin user.